Have you ever wanted to organize your content in Canvas pages in a way that chunks the content nicely, and reduces the amount of scrolling required on the page? One approach you might consider is presenting your content using tabs. This post will show you how (and give you the HTML code snippets to try it yourself!).
When Might Tabs be Useful?
You may find the amount of content on your Canvas pages makes it very “scroll-y”; that is, students have to scroll up and down a lot on the page to see all that they need to see. Using tabs can alleviate this, and organize similar bits of content into boxes that will appear in the same vertical space of the page.
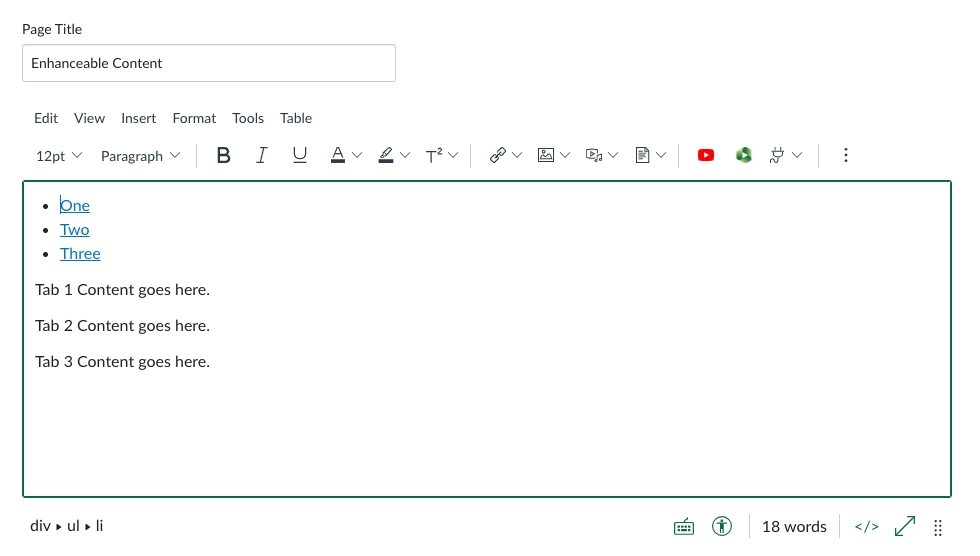
You may also be looking for another, more interactive way to “chunk” materials on the page. While using proper HTML headings is an important and basic way to organize and chunk contents, the additional use of tabs can also help make it clear to the student how the associated chunks are related to each other.
Chunking is a key strategy in instructional design that takes related bits of learning materials and reorganizes the content into smaller, more manageable units. This strategy can reduce the load on a learner’s working memory, making it easier to encode into long-term memory and therefore remember and recall later on.
For more on the concept, see: Content Chunking by Elan Paulson, Teaching and Learning Conestoga (2022).
Adding Tabs
To put very simple tabs into any Canvas page, use the Rich Content Editor:
1) Click Edit at the top of the page, then click the HTML button in the lower right corner.
2) Copy and paste the code (in the grey box below) into the Pretty HTML Editor. Replace the bolded text with the tab labels (marked One, Two, Three here) and content that you wish to use.
<div class="enhanceable_content tabs">
<ul>
<li><a href="#tab-1"><span>One</span></a></li>
<li><a href="#tab-2"><span>Two</span></a></li>
<li><a href="#tab-3"><span>Three</span></a></li>
</ul>
<div id="tab-1">
<p>Tab 1 Content goes here.</p>
</div>
<div id="tab-2">
<p>Tab 2 Content goes here.</p>
</div>
<div id="tab-3">
<p>Tab 3 Content goes here.</p>
</div>
</div>
3) Click the HTML button in the lower right again and you’ll see a static version of your tabs content. Click Save to give it a try!
4) Test out the page. It looks like this, and the user can click to toggle between the different tabs:
Some Additional Tips
- Note that the first tab will be active by default. Consider this when you decide how to organize your content.
- You can do additional styling (making text bold, italicized, etc.) and add hyperlinks and media content (images, video, etc.) within the tabs as needed.
- Be sure to use appropriate semantic markup (headings, paragraphs, lists, etc.) within the tabs content as needed. As with any web page building, this will maximize the accessibility of the content for learners who use assistive devices (like screen readers).
Thanks To…
Thank to Indiana University Information Technology Services for sharing this information and for their code snippets, which have been adapted here. To see more from their original post (now archived), see Adding enhanced interface components in Canvas content.
Photo by Anete Lusina from Pexels.


